FastAPI
Python micro-framework 🐍 - fairly recent (2018)
occupies the same space as
Flask - developed since 2010 - lightweight and extensible
Django - developed since 2003 - perceived as more complete but also heavier
🚧 Micro-framework doesn’t mean not usable on large projects ⚠️
FastAPI vs Flask
FastAPI is similar on the surface to Flask, but much more modern!
encourages a more structured approach
leverages type information (type annotations / Pydantic)
especially for automatic data validation / conversion
so you can define separate models for creation, reading, updating, etc.
useful for example for password hashing (not exposed)
in particular, automatically generates interactive documentation
has native support for asynchronous programming
as well as for websockets
Why FastAPI (and not something else)
1️⃣ You all more or less know how to do Python 🐍
so we eliminate everything that’s not Python-based
2️⃣ We’ll try to teach you things used elsewhere
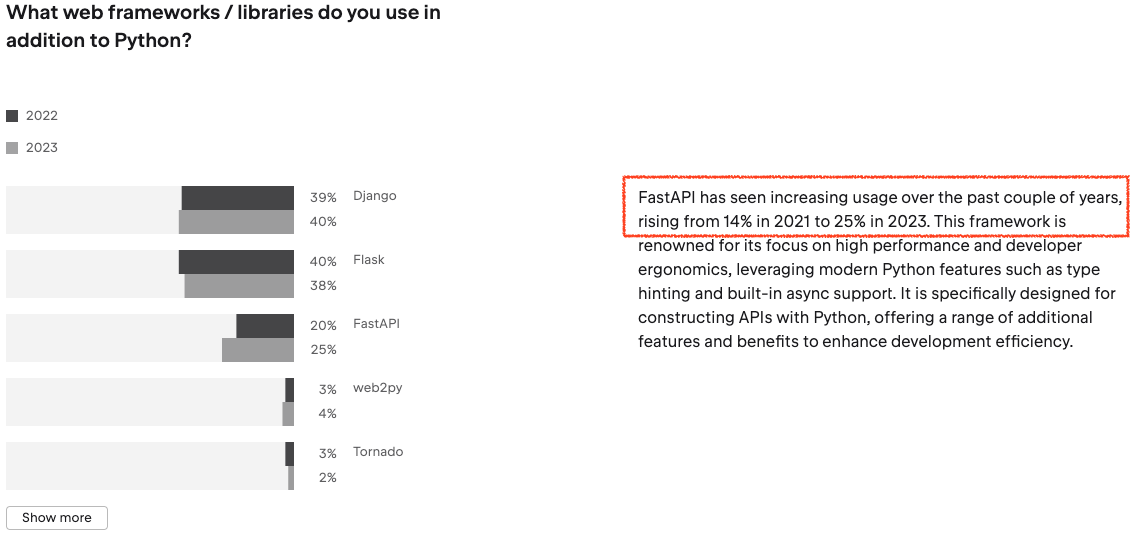
And the FastAPI trend indeed seems to be experiencing spectacular growth!
Graphical User Interface
But actually... why are we interested in this?
The GUI (pronounce gooey) is what bridges 🌉 between:
a calculation/data processing code/...
and a user interface
GUI - two approaches
Old school
Using graphical libraries and developing a “thick” client

New age
Using the browser

FastAPI: we already know a bit
We already vaguely know how to use it, remember, we’ve already seen
Notice how simple it is to get started 😯
this is *a pro of Flask/FastAPI over Django (which requires a more advanced setup)
Quick recap
Step 1️⃣:
from fastapi import FastAPIStep 2️⃣
app = FastAPI()Then we attach Python functions to URL paths
we call these functions route handlers or router functions
@app.get("/a/path/target")
def the_corresponding_function():
  // does very smart things
  return a_result    # which can be data (json) or html or whatever...
And to start the server?
From the terminal
fastapi dev my_app.pythe server in development mode
fastapi dev my_app.py --port 8080or on another port
or also
fastapi run my_app.pyin production mode
using uvicorn
uvicornNote that fastapi is often also run through a dedicated http server named uvicorn
# for example, here in dev mode on port 8080, where
# (*) my_app is the Python module name (so without .py; replace / with . if in a subfolder)
# (*) app is the name of the Python variable that refers to the FastAPI instance

uvicorn my_app:app --reload --port 8080
Parameters in a GET
For GET requests, we can write slightly more sophisticated URLs:

Of course then we need to retrieve the arguments in the handler function 🤔
FastAPI has it all figured out
@app.get("/some/route/data")
def get_parameters(
        name: str,
        age: int):
    return {'name': name, 'age': age}
you just need to declare the parameters
with their type
and FastAPI does the rest
and even type conversion
🚧 No notion of type in network exchanges, everything is a string 🚧
Parametric URL
Now you can also - and more in line with best practices - define parameters within a URL itself
e.g. then your users would call URLs like /my/route/basile/42 instead

and of course you can also receive multiple parameters this way
@app.get("/my/route/{name}/{age}")
def url_parameter(name: str, age: int):
return ...Note: Special case for /
by default a parameter does not contain a slash
/but in a route you can declare
@app.get"/my/route/{parameter:path}"to allow slashes
/in the parameter itself
More kinds of parameters
in all generality, parameters can be passed in 5 different ways in an HTTP request:
in the URL path
(e.g./my/route/basile/42)in the URL query string
(e.g./my/route?name=basile&age=42)in the request body (e.g. for POST requests)
in the request headers
in cookies
here’s an example of a request with parameters in all these different places, freely inpired from the pixels-war game

Capturing parameters in the FastAPI route handler
1 2 3 4 5 6 7 8 9 10 11 12 13 14 15 16 17 18 19from fastapi import FastAPI, Header, Cookie, Query, Body from pydantic import BaseModel app = FastAPI() class PixelPayload(BaseModel): i: int j: int color: str # e.g. "#ff0000" @app.post("/api/{map}/set") async def set_pixel( map: str, defer: bool = Query(False), authorization: str = Header(...), signature: str = Cookie(...), payload: PixelPayload = Body(...), ): ...
with this code, inside the router function, you can access the parameters as follows:
Python code | value |
|
|
|
|
|
|
|
|
|
|
FastAPI does the heavy lifting for you
as you can see FastAPI takes care of parsing the request and extracting the parameters for you
in particular observe how the payload parameter is automatically converted from JSON to a PixelPayload object
this is in anticipation of the next episode where we’ll see how to use Pydantic models to define the structure of the data we expect in the body of a request
also notice how the defer, authorization, and signature parameters are extracted from the query string, headers, and cookies respectively.
Cookie is a special case of Header, but FastAPI provides a convenient way to access cookies directly.
Returning data
remember: everything is text over the network
by default, FastAPI returns data in JSON format
this means that when you say e.g.
1 2 3 4@app.get("/my/route/{name}/{age}"): def url_parameter(name: str, age: int): return {'name': name, 'age': age}
what is sent back to the client will be the text:
{
  "name": "basile",
  "age": 42
}
so remember to interpret this text as JSON on the client side
→ A random generator (exercise)
read the code - at least the 2 first
getendpoints for nowstart the server
point your browser at the documentation page at
http://localhost:8000/docs
Exercise 1 - the docs
Exercise 2 - from the browser
hints
remember that for GET requests, parameters are passed in the URL after a
?and separated by&also remember that the interactive documentation page shows you the exact URL to use
Exercise 3 - from the terminal
hints
httpis from thehttpiepackagedo not hesitate to pass
httpthe-voption to see what is sent and receivedbe aware that in
bash, the&character is special (it puts the command in background), so you need to either escape it with a backslash\&or put the whole URL in quotesalso be aware that with
http, there are more convenient ways to pass parameters than just putting them in the URL - see the solution below for details
Exercise 4 - error handling
Exercise solutions
Solution to Exercise 2
in the browser, you need to type the full URL, i.e.
1http://localhost:8000/api/integer?min=100&max=200&count=10
Solution to Exercise 3
first naive approach:
withhttp, you can use the same URL as in the browser
but you need to quote it because of the&characters, like this:1 2 3 4# long version - watch out for quotes! # you can do this, but it's a little awkward # because & is a special character in bash http "http://localhost:8000/api/integer?min=100&max=200&count=10"now,
httpmakes it a little simpler / less awkward
for one thing, you can skip thelocalhostpart and just use:8000
and also, you can pass parameters directly as arguments tohttp, like this:1 2 3# short version, to pass parameters with GET # however you MUST use == http :8000/api/integer min==100 max==200 count==10NOTE using just
=would NOT WORK1 2 3 4# WARNING: the simple = is for POST requests! # if we use = it doesn't do what we want! # DON'T DO IT LIKE THIS! # http GET :8000/api/integer min=100 max=200 count=10
Solution to Exercise 4
as it stands, there is no control on the parameters
so the server calls the random.uniform function with invalid parameters, and that generates a 500 error
to address this, several choices are possible:
either we add a check in the
some_random_floatsfunction to verify thatmin < maxand if not we raise an HTTP 400 (Bad Request) exceptionor we use Pydantic’s validation features; but for now that’s premature since we haven’t seen Pydantic yet 😉
so for now we’ll settle for the 1st solution
1 2 3 4 5 6from fastapi import HTTPException def some_random_floats(min: float, max: float) -> float: if min >= max: raise HTTPException(status_code=400, detail="Invalid range") return random.uniform(min, max)
HTTP verbs
Quick reminder from the 1st episode, HTTP different possible requests
GET: requests to obtain a resource from the server (html/css/js file, image, video, data, ...)POST: requests to send data to the server for processing (adding a user to a database, ...)PATCH: requests to partially modify a server resource (updating a user’s email address in the database)DELETE: requests to delete a server resource (deleting a comment on an article, ... )
These are the main types of requests but there are others, for the complete list you can check here: Hypertext Transfer Protocol
there’s also a PUT verb
PUT verbin theory, PUT is the verb that should be used for creating a new entity
however for historical reasons, entity creation is often done with POST requests...
Parameters in a POST
seen above: GET parameters are in the URL
like we’ve seen above, e.g. /my/route?param1=val1¶m2=val2
and FYI, the HTTP protocol doesn’t provide for putting parameters in the body of a GET request, if you do it anyway the behavior is undefined...
however for POST, PATCH, DELETE requests, ...
the parameters are passed in the body of the request
Let’s look at an example
POST requests
And to start let’s look at what is sent by httpie when we do a POST
the body of a POST request
Here it is
1 2 3 4 5 6 7 8 9 10 11 12 13❯ http -v :8000/api/seed seed_value=42 POST /api/seed HTTP/1.1 Accept: application/json, */*;q=0.5 Accept-Encoding: gzip, deflate Connection: keep-alive Content-Length: 18 Content-Type: application/json Host: localhost:8000 User-Agent: HTTPie/3.2.4 { "seed_value": "42" }
As we can see, the parameters are sent
in JSON format
and in the Body of the request - i.e. after the headers
note on typing: int vs str
int vs stralso note here that the value 42 is transferred over the wire as a string "42"
this is because by default http treats all parameters as strings
the actual conversion to integer will be done on the FastAPI side
we could have forced it to send an integer by using seed_value:=42 instead of seed_value=42
this is useful, especially when sending boolean or numeric values
→ On the FastAPI side
Here now is one FastAPI code that works well to handle this request
1 2 3 4 5 6 7from fastapi import Body @app.post("/api/seed") # with Body() we indicate that the parameter comes from the request body def set_seed(seed_value: int=Body(..., embed=True)): random.seed(seed_value) return {"message": f"Seed set to {seed_value}"}
it’s simpler with Pydantic
we’ll see this later, but things get a little simpler with a Pydantic model to define the parameters...
What’s next
At this point you know how to implement FastAPI endpoints that handle GET and POST requests with parameters
We have many other things to see, including:
how FastAPI leverages type annotations to do automatic validation
how to return HTML rather than JSON data
as well as a few other tips & tricks
We’ll see that in the following episodes...